Programming Languages Articles
Top 9 C++ Project Ideas with Source Code
The Easiest Programming Languages to Learn in 2024
Coding Canvas: A Structured & Powerful Approach to Learn Programming

Get In Touch For Details! Request More Information

How To Make A Basic HTML Form In Flask?
Apr 16, 2024 6 Min Read 2440 Views
(Last Updated)
Are you struggling to make a basic HTML form in Flask? In this article, we will make sure that you end up making one!
Firstly, we will have a look at an example of using Flask with HTML forms. We widely use HTML forms over the web. Mostly, for collecting information. This article will help you to create an HTML form and integrate it inside a Flask web framework.
Table of contents
- Starting with Flask
- How to install FLASK?
- How to make an HTML form in FLASK?
- Understanding arguments passed inside the functions
- Running the web app through the command line
- Creating an HTML form in Flask
- Sneak-peak of the folder structure while creating an HTML form in Flask
- Making changes for rendering the new home page:
- Submitting the HTML form in Flask
- A quick introduction to jinja2 templates and its delimiters
- Delimiters used in jinja2:
- Creating a submit page to view passed information:
- That is how we create an HTML form in Flask
- Test your understanding about Flask, attempt these practice MCQs now:
- Wrapping Up
Starting with Flask
Flask is a micro-web application framework. Armin Ronacher is the man who developed it. Written in Python language, Flask is based on the Werkzeug WSGI toolkit and Jinja2 template engine. While making websites and web application APIs, we use Flask.
How to install FLASK?
So, to start using Flask, we first need to install it onto our system. To clarify, installing Flask is easy. This is so, as Flask is a pip installable library, and we can use the ‘pip install Flask‘ command in our terminal to install it. After installing Flask, we also require a text editor to write our code. So, let us start writing our code in the text editor!
Before diving into the next section, ensure you’re solid on full-stack development essentials like front-end frameworks, back-end technologies, and database management. If you are looking for a detailed Full Stack Development career program, you can join GUVI’s Full Stack Development Career Program with Placement Assistance. You will be able to master the MERN stack (MongoDB, Express.js, React, Node.js) and build real-life projects.
Additionally, if you want to explore HTML and CSS through a self-paced course, try GUVI’s HTML and CSS self-paced certification course.
How to make an HTML form in FLASK?
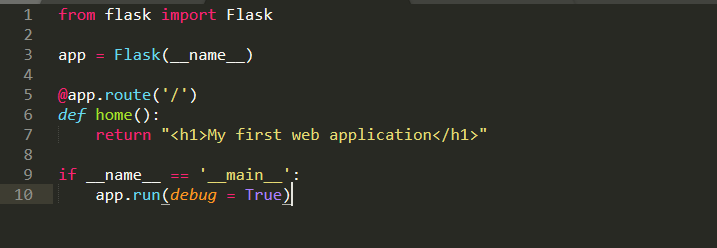
To start building an HTML form in Flask, we will start writing a Python script like in the above image. After that, save this script onto our system with the name app.py. We want to make a web app using Flask, so we will begin importing the Flask module from the flask library in our script file. Subsequently, we will create an object of the Flask class, this object is our WSGI application (here, we have named the object as an app). If we observe carefully in the second line, the Flask constructor takes __name__ as a parameter. It is the name of the current module.
Now, let us set up routes for our web app. The Flask class consists of the route() method. It is a decorator function that tells the app which URL to use to call the associated function. Have a look at the syntax for app.route() function-
app.route(rule,options)
Understanding arguments passed inside the functions
You can understand the arguments passed inside the rule() method as follows:
- rule- It signifies the URL. This URL bounds with the function. This is to say that to trigger the function we need to hit that particular URL.
- options- It is an optional argument that consists of a list of parameters. We associate these parameters with the rule object.
In lines numbers 3 and 4 of the code snippet, we can see the ‘/’ URL binds to the home() function. Whenever we call / URL in the browser, then we kind of trigger the home() function, and its output will be displayed.
At the last, we will have to make a call to the run() function using the Flask object (here app.run()) that will run our web app onto the local development server.
Here is the syntax for app.run() function:
app.run(host, bug,debug,options)
To understand the arguments inside the run() function, refer below:
- host: It is the hostname over which the app will run. The default value of the host is 127.0.0.1 (localhost of our system). To run an external server we need to set it to 0.0.0.0
- port: It is the port address that our server will be listening to. Set the default port value to 5000.
- debug: It is usually set to False. But when we turn it to True it provides debugging information on the console. It will allow us to debug our script in runtime and we do not need to restart the server again and again after making subtle changes.
- options: It consists of additional information. You should pass this information to the server.
Above all, it should be noted that all the arguments passed to the app.run() function are optional. So, we need not pass them at run time. Therefore, the function will be executed using the default parameters. We are getting closer to finishing building an HTML form in Flask.

Running the web app through the command line
We will execute our written Python script (here, app.py) using the following command on our command prompt/terminal to run our web application (here, app.py).
Python app.py
Meanwhile, this will set up a web server on our PC’s localhost URL, i.e, 127.0.0.1. Thereupon, the port is set to 5000. We obtain the below output after running the command. Our web server starts running on URL http://127.0.0.1:5000/.

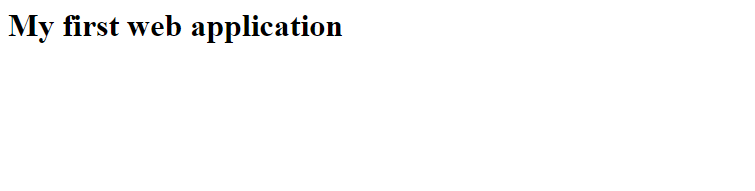
Subsequently, we can copy and paste this URL on our web browser to see the running of the webserver. After running the web server, we can see the results as shown in the image given below.
Creating an HTML form in Flask
Now, that we know some basics of Flask, we will create a flask HTML form.
Before we proceed further, let’s discuss the folder structure we will be using to make our HTML form using Flask.
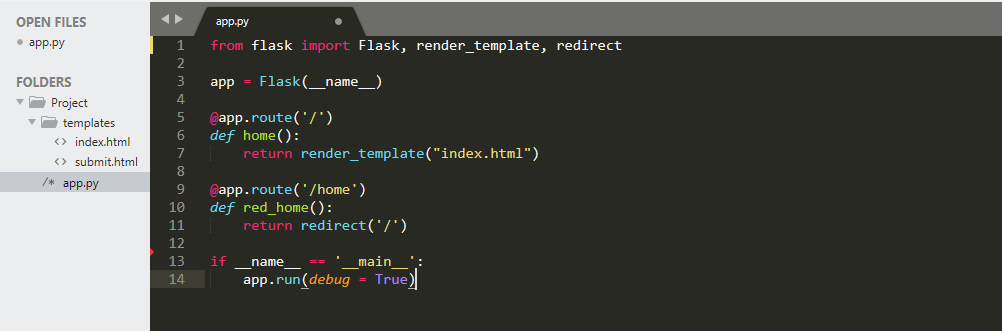
We will start with creating a new folder named Project on our desktop and inside the folder, we will create our app.py file. Also, inside the Project folder, we will create a subfolder named templates. All our HTML pages will be stored inside this subfolder. Flask automatically uses the render_template method (we will discuss it later in the article) to load these HTML pages for display into the web app.
Sneak-peak of the folder structure while creating an HTML form in Flask
Our folder structure will look something like this (see the left pane showing open files and folders):
We will create a submit.html page later in the tutorial.
Now, we will be creating the home page/index page for our web app. This page will display the form. We will create “index.html” inside the template subfolder. After that, we start writing HTML code in this file in our editor. Firstly, we will create a simple HTML form. This form takes the input of information from the user. Finally, it displays the content inside a table. We will write the code as shown below:
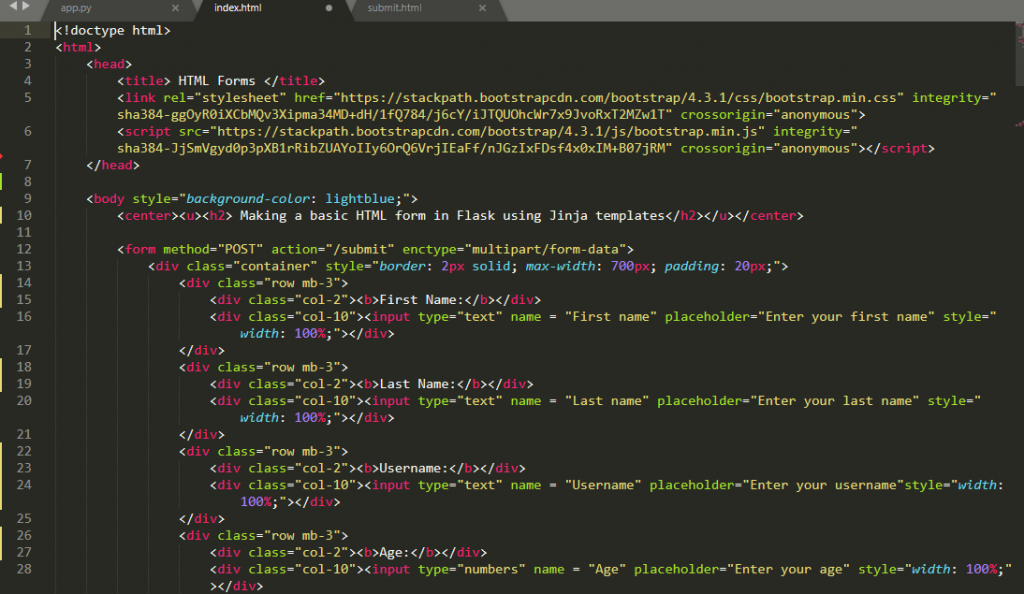
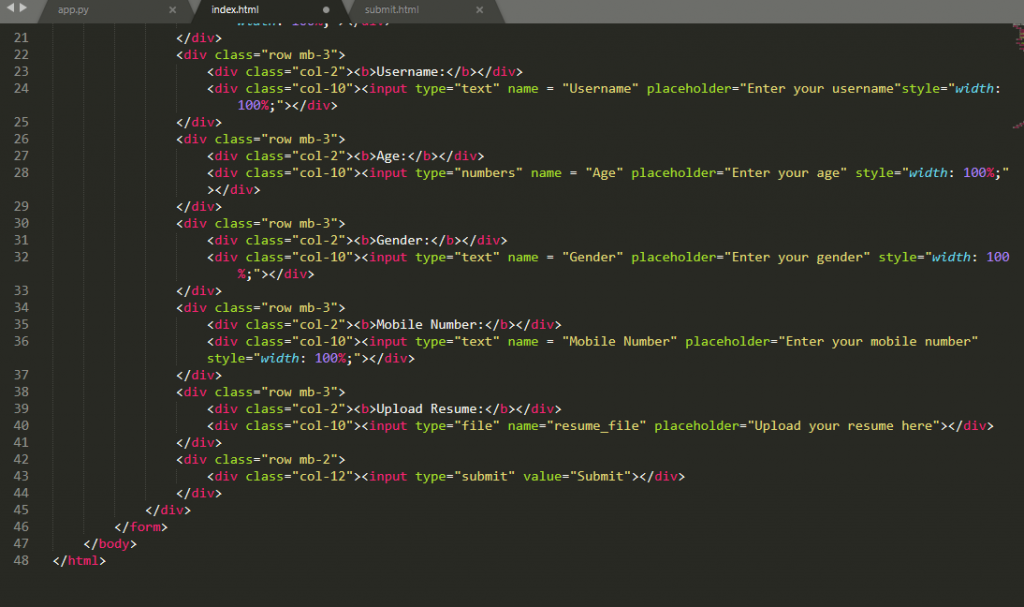
We are creating the form using the <form> tag provided in HTML. The form tag has attributes like the method in which we have passed the value as POST because the POST request method is more secure as the user needs to fill in sensitive user information. The action attribute is given value /submit. This is because when we click submit button, we are redirected to submit page automatically.
Inside the form, the <input> tag is used to take user input. The type is set to either text/numbers/file depending on the type of input that we want to provide.
So, for alphabetical data (single-line input): we provide input type as text.
And for numerical data (integers, floats): we use input type as numbers.
Consequently, for files (.pdf, .txt, .doc, etc.): we use input type as file.
Also, for submitting data: we pass submit inside the input tag.
To add some styling and proper formatting we have used basic Bootstrap templates. You can download these easily. Also, it can be used as it is from Bootstraps’s official website for free.
Making changes for rendering the new home page:
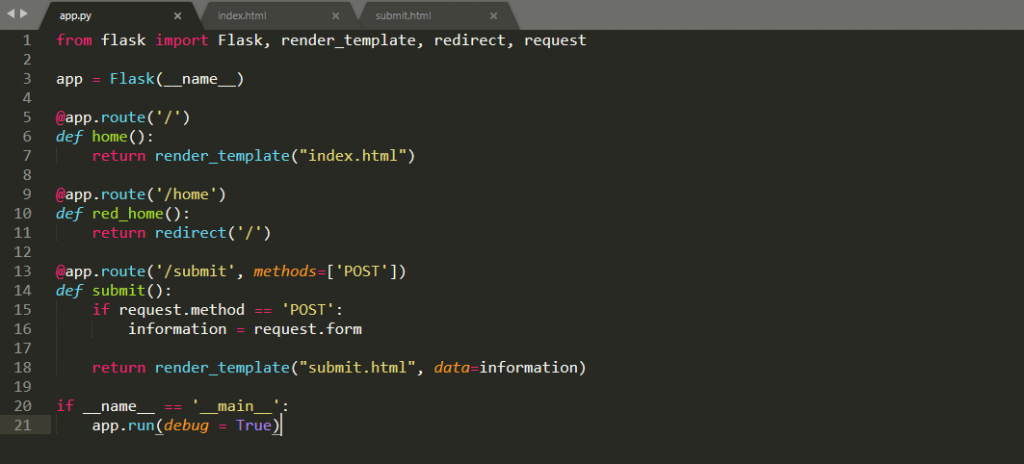
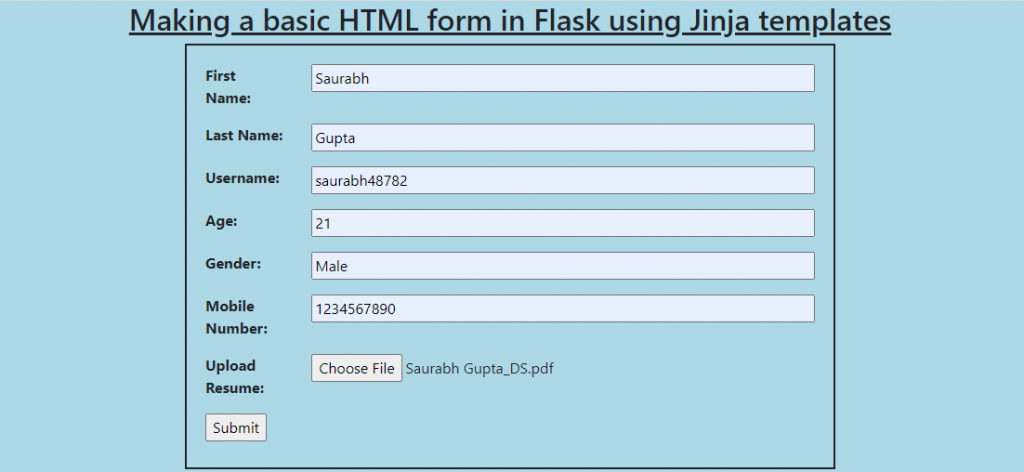
Note, that in the updated app.py file, we are not returning the simple string as before. Instead, we are now rendering a template using the render_template() function provided in the flask library. We will be displaying the “index.html” as the home page, that is why we have passed index.html as the parameter inside the render_template() function. When we refresh and run the server again the home page our page will look like this:
Submitting the HTML form in Flask
After filling the form, we should hit the Submit button. Consequently. the information gets stored in the form of key and value pairs. After that, the submit page URL will be loaded as specified in our index.html file.
Upon clicking the Submit button, a new submit page URL gets loaded. It can be verified from this piece of code inside the app.py file.

Here, we request all the information stored in the form. And save it inside the information variable. After that, we need to pass the data variable in the render_template() function. When loading the submit page, the information can be retrieved from this data variable on the submit.html page.
A quick introduction to jinja2 templates and its delimiters
Subsequently, in the next section, we will be creating a submit page. It will display all the information entered by the user in a tabular form. For its design, we will be making use of the jinja2 templates. It enables us to write Python code along with HTML code.
To clarify, Jinja2 is a text-based designer-friendly templating language for Python developers. So, we can use it for generating HTML, XML, or any other markup formats. Initially, Jinja2 templates were made after Django’s template. But it provides Python-like expressions.
Delimiters used in jinja2:
Jinja makes use of different delimiters in the template strings. It takes user inputs as below:
- {% ….. %}: We use them for writing statements
- {# …… #}: We use them for writing comments that don’t get displayed on the template output
- {{ }} : We use them to print/display template outputs.
- # ##: We use them for writing line statements
We will make use of these delimiters in the next section to render our templates after writing the Python code.
Creating a submit page to view passed information:
As of now, we have only written code for taking inputs from the user. Similarly, we will create a separate file named “submit.html” inside the templates folder. Likewise, we will write code for displaying our entered information in a tabular form. We can write the HTML code as:
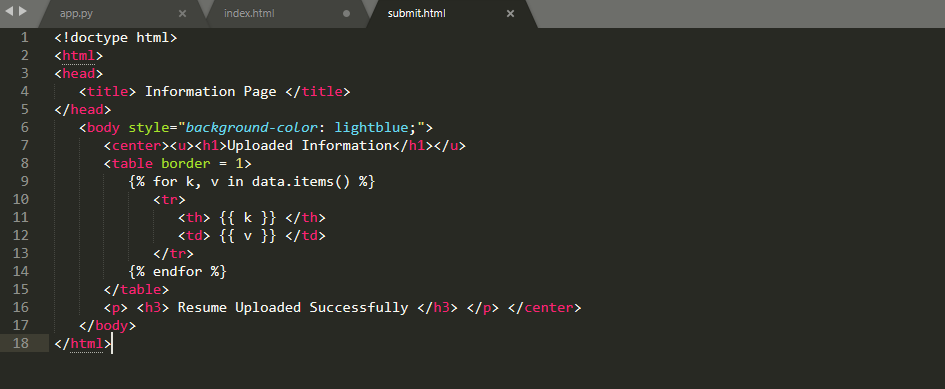
Note, that we can write Python code inside the HTML file using jinja2 templates. That is to say, we are using jinja templates to write Python code for accessing each key, value pair stored in the data variable. So, we pass the data variable in the render_template() function. It contains all the information entered by the user.
Inline number 9, we made use of {%….%} jinja2 delimiter for writing our Python code statements as we discussed in an earlier section, we will run a for loop to display each key-value pair that is being fetched from the data variable. To show the fetched key, value pairs we are making use of another {{ }} delimiter line 11 and 12, that displays template outputs, and line 14 marks the end of for loop with {%….%} delimiter.
That is how we create an HTML form in Flask
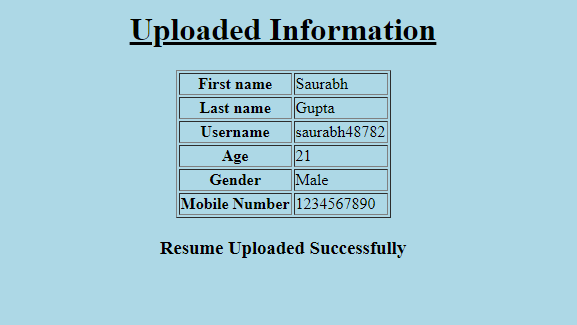
To sum up, on loading our submit.html page, it will look like this:
Test your understanding about Flask, attempt these practice MCQs now:
Question 1. Flask is a web framework written in which programming language?
(a) C++
(b) Java
(c) Go
(d) Python
Correct Answer: (d) Python
Flask is a micro-web framework written in Python.
Question 2. Python logic statements as inputs can be written inside Jinja2 delimiters/tags represented by?
(a) {% %}
(b) {{ }}
(c) %{ }%
(d) ## ##
Correct Answer: (a) {% %}
We use {% %} delimiters/tags to take input logic statements in using Jinja2 templates while {{ }} are used for outputting results to the end-users.
Question 3. What is the default URL address of the localhost on which the flask app is loaded?
(a) 127.0.0.0
(b) 127.0.0
(c) 127.0.0.1
(d) 255.255.0.0
Correct Answer: (c) 127.0.0.1
The default URL of the localhost is 127.0.0.1 where the Flask app is loaded by default after running the server.
Question 4. Which amongst the following is not an HTTP method used to retrieve data from a URL in Flask?
(a) GET
(b) POST
(c) PUT
(d) ALTER
Correct Answer: (d) ALTER
All the other options excluding ALTER are HTTP methods that are used to obtain data from URLs in Flask.
Question 5. Which decorator function informs Flask to trigger which URL?
(a) render_template()
(b) route()
(c) __name__
(d) run()
Correct Answer: (b) route()
route() is the decorator function that tells what URL should our function trigger in Flask.
Kickstart your Full Stack Development journey by enrolling in GUVI’s certified Full Stack Development Career Program with Placement Assistance where you will master the MERN stack (MongoDB, Express.js, React, Node.js) and build interesting real-life projects. This program is crafted by our team of experts to help you upskill and assist you in placements.
Alternatively, if you want to explore HTML and CSS through a self-paced course, try GUVI’s HTML and CSS self-paced course.
Wrapping Up
That was crazily easy, right? Yes, when we learn things the way they need to be then we find the concepts easier. Learning becomes interesting at GUVI. If you wish to know more about any specific concept or learn any tech language altogether, you may let us know in the comments. Any queries? Add them too in the comment section, as we look forward to discussing more with you.
Immaterial of whether you are a beginner programmer or an advanced professional, GUVI courses will help you discover those hidden stairs to an advanced career, which you really expect from an institute when you step in.
You may leave us your contact, we will get back to you with more details and good courses for you!


Did you enjoy this article?